第一步:在阿里云主域名下解析添加二級域名

第二步在阿里云云盾中購買https協議,并綁定域名, 如果只為測試建議購買免費版的

第三步在nginx中配置二級域名的server
nginx配置 http走的是80端口
nginx配置 https走的是443端口

二級域名配屬nginx有多種方法本人在這是用nginx導入文件夾所有的二級域名配置與主域名配置分離開來,避免耦合過深
導入二級域名所在目錄文件夾到nginx中

二級域名所在目錄

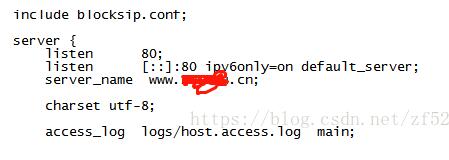
二級域名配置如下

最后一步 進入nginx的sbin目錄 通過 ./nginx -t 命令查看配置是否出錯

配置ok 則用命令./nginx -s reload 重啟 則https應用成功
在后端代碼也要配屬https服務,詳細請查閱資料
補充知識:nginx域名重定向遇到的問題
應客戶要求,需要給客戶配個域名,然后我們的大牛強哥 建議后臺不要配備域名服務器了,這樣不安全,一般都是對外的web服務器才配置域名;
結合另外收藏的一個博文安裝nginx,然后修改配置文件如下:
---一個域名對應一個conf文件;;;
server {
    listen    80; ——————————固定端口80
    server_name A B; ——————逗號間隔一級域名、二級域名
    location / {
      root  /alidata1/tomcat-tes/……;————————服務器絕對路徑 根目錄
      index index.html index.htm index.jsp;
      proxy_send_timeout 1200;
      proxy_connect_timeout 1200;
    proxy_pass http://121.41.*.216*;——————————要比對的地址
    proxy_set_header    X-Real-IP $remote_addr;
         proxy_set_header    X-Forwarded-For $proxy_add_x_forwarded_for;
         proxy_set_header    Host $http_host;
    }
  location /share {————————服務器業務模塊二級路徑
         index index.html index.htm index.jsp;
     proxy_send_timeout 1200;
         proxy_connect_timeout 1200;
         proxy_pass http://121.4*;
         proxy_set_header    X-Real-IP $remote_addr;
         proxy_set_header    X-Forwarded-For $proxy_add_x_forwarded_for;
         proxy_set_header    Host $http_host;
  }

  location /chao {
         index index.html index.htm index.jsp;
     proxy_send_timeout 1200;
         proxy_connect_timeout 1200;
         proxy_pass http://121.41.4*/;
         proxy_set_header    X-Real-IP $remote_addr;
         proxy_set_header    X-Forwarded-For $proxy_add_x_forwarded_for;
         proxy_set_header    Host $http_host;
  }
  }
修改完了之后要重啟nginx 命令: service nginx restart
如果有必要還重啟一下tomcat,
配置第二個域名,同一目錄下的另外一個端口登陸地址,則需要另外再建一個conf文件
以上這篇使用nginx+二級域名+https支持就是小編分享給大家的全部內容了,希望能給大家一個參考,也希望大家多多支持腳本之家。